closeup of haybine with swath of cut forage

Some Thoughts about Haymaking for Beef, Sheep, and Goat Farmers

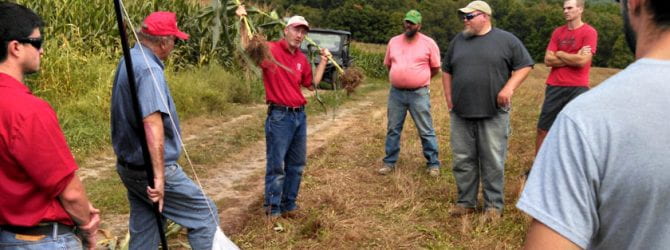
At this time of the year, farmers are prepping their haymaking equipment and are planning their haymaking strategies.  The goal for dairy farmers is to start making hay as early as possible (in Delaware County, this is mid-May) to capture the highest possible quality of forage.  Dairy farmers then aim to make subsequent forage harvests about one month apart.  This forage is typically either made into haylage or baleage.  This cutting strategy maximizes the quality of their forage harvest in order to support the milk production of their cows.

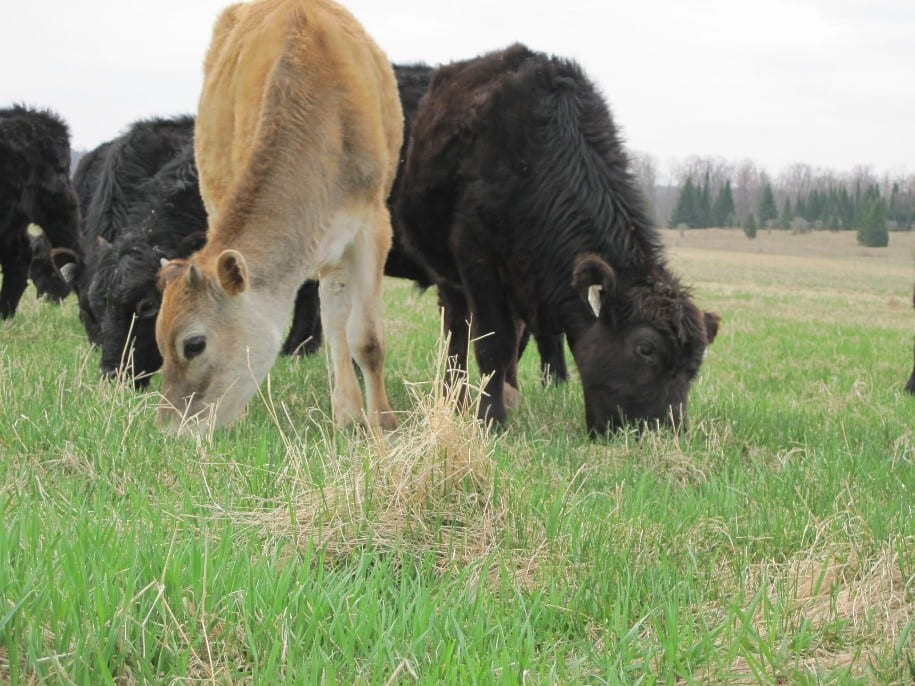
But should a beef, sheep, or goat farmer attempt to do the same?  Well, the answer is that depends.   Non-dairy livestock have lower energy demands for significant periods of the year.  Most livestock farmers birth their animals in the spring and then graze the livestock on pasture for the rest of the summer.  By fall, the young are often weaned and sold.  That leaves us largely with our breeding animals that enter winter in a ‘maintenance’ state.  These animals do not need energy dense stored forages during most of the winter.  In fact, if they did eat “dairy cow quality” hay, they could get fat.

Making really high quality hay is expensive and time consuming.   And if our beef, sheep and goats do not need high quality hay for the winter feeding season, should we go through the extra cost and effort to make it?   In fact, a later cut hay is a better match to the nutritional needs of beef cows or non-lactating sheep or goats.  Here are two potential cost saving opportunities you may want to consider:

  1. Reduce the number of times you cut hay each year on any given field and start later. You can get the same quantity of forage in the year but with less tractor time, fuel, and labor. (Think two cuttings instead of three or four cuttings.)
  2. It is more likely that you will be able to make dry hay. The cost of plastic ranges from about $3.00/round bale in in-line wrapping systems to almost $7/round bale when you wrap the bales individually.  Assuming you have a place under a roof to store your dry round bales, this is money and time you might be able to save.

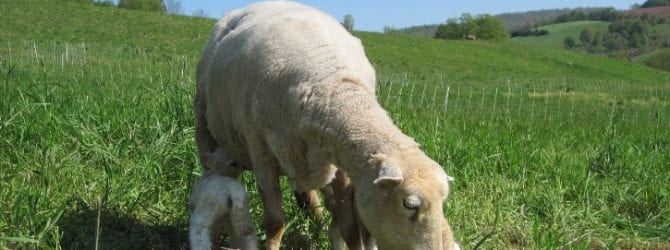
What about our still growing youngstock, late gestation ewes or goats with twins, or early lactation ewes and goats with twins?  These animal classes all need high quality forages or an energy supplement such as grain.  So, if you are feeding hay or baleage to these classes of animals, you may still need to make or purchase some “dairy cow” quality hay for them.

My advice – make a hay harvest plan to create the forage inventory you need to adequately meet the nutritional needs or your animals.  Want help in doing this?  Email Rich Toebe at rrt43@cornell.edu.

1…2…3 Blades Go! Or Wait! Grazing Tips from the Point of View of the Grass and Weather

Every year it’s a game of hurry up and wait. In March, the pastures started to green up and thoughts of an early spring and early grazing turn out came to mind. However, by the end of April we had dipped back to being chilly, snow blanketed parts of the county, and 3 inches of rain was in the forecast. So when will we be able to turn out our cows, sheep, or goats. That answer is, it’s complicated.
From the plant’s point of view, the three-leaf phase is where the grass plant wants to be. The grass tiller or stem has grown to the point of having three leaves with a collar developed around the stem, like the collar of a shirt. At this stage, the grass plant has grown to the point where it has replenished its reserves and is getting most of its energy to grow through photosynthesis. At this phase of growth, the grass plant will be able to tolerate grazing and not be stunted when grazed correctly. It is important to leave enough solar panel, residual grass left after grazing, so that regrowth happens quick and the plant doesn’t have to use its reserves to push new growth. Residuals of 3-6 inches will allow you to start grazing earlier the following year and shorten rotation times. Figure 1 shows the variations in grazing management with orchard grass.

Residue effects on vegetative orchardgrass from grazing. Short grass residue results in grazing later in the spring compared to leaving taller residue. Ideal residue is about 3in for orchardgrass.

Figure 1 shows the changes in grazing management and the effects on yield and growth rate
Source: Geoffry Brink, US Dairy Forage Resource Center


Grass at the 3- leaf stage.

Figure 2 shows the grass stem at the three-leaf stage.

Field conditions are another set of factors that dictate when or where to graze the animals in spring. If the plant is ready but field conditions risk pugging up the soil, it might be best to leave them on the barnyard or sacrifice paddock a little while longer. This way other parts of the farm aren’t destroyed and production hindered for the rest of the year. If animals have to go out, try grazing your animals on the driest part of the farm or flash grazing pastures. Flash grazing allows the animals to eat the tops of the plant but are moved fast enough that they are unable to walk back over their initial grazing spot a second or third time. Controlling that second pass is important in preventing pugging in the pasture.

Cows laying down in a pasture that has pugging damage from having wet soils.

Source: Agriculture Victoria, Pasture Recovery from Pugging Damage

Just remember if there is an option to buy or feed extra home grown hay, there is nothing wrong with leaving animals on their concrete barnyard or sacrifice paddock a little longer but we need to plan accordingly, especially if animals will start to calve, kid, or lamb in that area. This may mean cleaning manure more often or allowing some of the hay being fed to be used as bedding as well. Make sure there is a plan A, B, and C and keep a watchful eye on your stock.

Happy grazing!
Ben Hepler
Nutrient Management Community Educator, CCA


bottles of hand sanitizer

Delaware County Hand Sanitizer & Face Covering Giveaway for Farms

Cornell Cooperative Extension of Delaware County, in cooperation with New York State Agriculture and Markets, will begin distributing hand sanitizer and face coverings to Delaware County farms this week at no cost to farmers. Distribution will take place between 10am and 2pm at 3 locations around Delaware County. Proof of agriculture status is required and contact information will be collected for tracking purposes.

Hand sanitizer is available in one-gallon containers with hand pump and 2 oz sprays.
Face coverings are available in packages of five.

Car Side Distribution:

  • Friday, May 15th at Watershed Agricultural Council (WAC) Office, 44 West Street, Walton
  • Thursday, May 21st at McDowell & Walker, 4 Depot Street, Delhi
  • Saturday, May 23rd at Stamford Farmer’s Coop, 18 South Street, Stamford (Fertilizer Building)

Distribution of the hand sanitizer and face coverings will ensure a safer sale and distribution of locally produced food, particularly at U-Pick, farm-stand, and farm market operations.  Perfect timing as fresh local strawberries become available in mid-June!

To ensure we have adequate supplies in each location, please register online to let us know which pick-up event you will be attending. For more information and to register, please visit the CCE Delaware website at ccedelaware.org. If you cannot attend one of the distribution events and need sanitizer and/or face coverings, please call (607) 865-6531 to arrange pick-up. We look forward to seeing our farmers during this time with appropriate physical distancing measures in place! These events are for Delaware County farmers. If your operation is not located in Delaware County, please visit https://cce.cornell.edu/localoffices to find your local Extension Office.

Cornell Cooperative Extension is an equal opportunity, affirmative action educator and employer.

hand holding coin near risk meter tuned to yellow

Risk Management is Essential on Dairy Farms

Agriculture is inherently a risky business.  Farmers face various kinds of risks including weather, financial, human resource, marketing and legal risks.  When farms are offered opportunities to mitigate risks, they need to consider how much their operations are exposed to certain risks and then take action to reduce or eliminate risks.

Weather risk is constant and there are some ways that dairy farmers can manage weather risks depending on the crops they grow and the methods they use.  For instance, a dairy farmer in the Northeast can tailor corn varieties to mature within an appropriate range for our shorter growing season so that they can then plant a cover crop to improve soil health to mitigate climate change.  They can also purchase crop insurance if they depend heavily on a certain crop to provide feed for their cows.  Most farmers harvest their own crops and manage fertility to make the best forage for their herd.  Having more control over a crop mitigates risk in crop production.  USDA promotes crop insurance as a risk management tool for high-risk crops or crops that the farmer’s profitability depends on and policies are widely available. The decision to purchase crop insurance depends on perceived risk and a farmer’s ability to either manage risk or transfer that risk to an insurance company.

Financial risk can come in many forms such as interest rate risk, credit rating risk, cash flow and debt level risks.  Banks use risk profiles to rate farmers asking for loans.  Currently, banks are looking very closely at liquidity, working capital and break-even milk prices in order to make loans (or not) to farmers.  Debt/cow is one measure that is easy to calculate by taking total debt and dividing it by the number of cows in the herd.  Low debt is under $3,000/cow and high debt is over $5,000/cow.  Banks offer interest rates based on the perceived risk to the bank that a borrower will default.  Having lower debt/cow mitigates interest rate risk and the increases the ability to borrow money.

Another measure in the risk profile is liquidity defined as the ability to cover current liabilities with current assets.  An example of a positive liquidity is being able to cover monthly expenses with monthly revenue.  If there is enough income coming in the bank looks at this as a lower risk profile loan and will be able to offer a favorable interest rate.

Break-even milk price is another measure that banks may use to determine if a dairy farmer is a good risk and eligible for a loan.  If a farmer can produce milk with a low break-even cost of $17.00/cwt then the farmer may be a good credit risk.  If the break-even is $19.00/cwt the bank may not be as interested in lending funds due to the “tight” nature of the finances.

Consider the current environment of low milk prices due to the “Black Swan” event dairy farmers face today with Covid-19 that has disrupted the processing and marketing of perishable dairy products.  The risk management tools that have been made available to dairy farmers include the Margin Protection Program (MPP) and the Dairy Revenue Program.  Participation in MPP in 2019 was very good locally since the program started late and producers already knew that they would receive more payments than premium and it was obvious that there would be a payout.  Some dairy farmers decided that signing up for 5 years at a discount would mitigate their risk by managing the margin between the feed price and milk price at a cost of $.12/cwt.  These farmers truly understood the concept that MPP is insurance against the unexpected and a “once and done” approach meant that they didn’t have to think about MPP again for 5 years.  MPP is subsidized and does not reflect the true cost of margin protection if it was purchased on the open market.  In the past 15 years, milk prices have been volatile for a number of reasons and MPP is insurance against losing the margin of profitability on farms that can insure up to 5 million pounds of milk annually.

If your farm is not currently participating in MPP, there will be an option to enroll this fall with USDA FSA.  This is your opportunity to minimize regret and maximize your margin at the $9.50 level.  It will also reduce stress knowing that you have made risk management an essential part of your dairy business.

~Mariane Kiraly

Thinking about Our Spring Pasture

Cattle grazing spring pasture

We seem to be getting an early spring this year. As I write this at the end of April, my average grass height in the pasture is almost 5”. The fences have all been checked and the water system is up and running. In fact, I have had my sheep out on pasture for about two weeks already (but not just pasture).
So, let’s review the decision making process for making the decision to transitioning your cattle, sheep, or goats to pasture. We need to think about it both from the perspective of the plants and the perspective of the livestock.
Let’s start with the livestock. They are going to transition from a stored feed that may be relatively dry and is high in effective fiber to a lush young grass shoot that is as high as 85% water, very high in protein, and is very highly digestible with little effective fiber. If the transition is made to quickly, your animals will have very watery manure and will likely lose weight as their rumens struggle to make the change. So the key is to make the transition slowly over the course of 10 days to 2 weeks. In my case, I am providing supplemental hay on pasture within a very limited pasture area. With each passing day, I give them another small area of pasture. This allows my animals to adjust to the change in diet while I start managing my pasture system for the coming year.
Now the plant’s perspective. Remember, in spring the plants are at their lowest energy reserves and are using those reserves to build their ‘solar panel’. Grazing these plants before they have developed a full set of “grazing panels” can weaken the plant and typically reduces the total amount of dry matter production on those fields for the current year. However, one of the greatest challenges of waiting until the grass is 8”-10” tall before starting grazing is that all of your pasture is then at the same stage of production and setting up a rotational system is more challenging. So, by starting ‘early’ in a specific area of the pasture helps to develop what is called the grazing wedge. A grazing wedge refers to having your pasture subdivisions or paddocks at varying stages of re-growth. Just make sure that you don’t come back to these ‘first grazed’ paddocks until the plants have fully recovered. Also, switch up where you start your spring grazing every year to avoid permanently setting back the productivity of that paddock.
So, in order to have a safe transition for both the plants and the grazing livestock, it is best to make the transition over the period of a few weeks. Here are some techniques commonly used in this area to make the transition:

  • Set aside some pasture the previous fall to be used as spring stockpile. In addition to having some fibrous dry matter from the previous season available to the animals, the plants in these pastures will have been able to build larger energy reserves for the winter months and will actually green up faster in the spring.
  • Continue to have highly palatable yet higher in fiber dry hay available to the animals as they are first turned out on pasture. Mid-summer second or third cut hay is often higher in fiber and yet still very palatable. Your livestock may not appear to eat much of it, but they will eat enough to maintain their rumen mat.
  • Find a way to limit the time on pasture. Start by letting them out of the barn for only a few hours a day, build to leaving them out for half days, and ultimately for the entire day. Make sure you have appropriate quality hay still available to them in the barn or lot.
  • Feed a high energy/low protein concentrate. Remember that the early spring grass has a lot of protein – more than the animal actually needs. If there is sufficient energy in the diet, the rumen bugs can capture this protein where it can be used as energy further down the digestive tract. If energy is lacking, this protein ends up in the bloodstream as ammonia and ends up in the liver where it is converted to urea. This takes energy, which the animal often may pull from their fat stores. This is why some growing animals appear to lose weight as they are turned out to pasture.

The 2020 grazing season is off to a great start. With thoughtful management, your animals will benefit from the spring flush and your pastures will be set up for a good year of grazing!

hand holding mask

Join in the NYS 4-H Mask Task!

Source: NYS 4-H Website

The NYS 4-H Mask Task gives back to your local community by sewing and donating a face mask and/or writing a note of gratitude to those in our community who are needing masks during this time!

WHAT IS THIS OPPORTUNITY?

4-H’ers are invited to express support for local community members who may need masks in light of the NYS guidance that everyone wear masks when going out in public due to COVID-19. Handmade masks and notes of gratitude will be collected at county Extension offices made available to those in need. Together, we can make a difference for our communities!

WHY IS THIS IMPORTANT?

Now that wearing a mask is mandatory in New York to the COVID-19 pandemic, availability of masks is running low so we are inviting NYS 4-H’ers, volunteers, friends & family (anyone is welcome!) to step up and help fill the gap.

HOW DO I GET INVOLVED?

1. View the CDC website page that provides info on on how to sew a face mask (no-sew option available too!) You may also find a different mask pattern that you like and that is fine too!
2. Create your project (work with a caring adult if you need support)
4. Write a note of gratitude, encouragement or support.
5. Share a photo of you and your project on social media platforms using the hashtags #4HMaskTask #CCEResponds #NYS4HResponds  (or email the photo to your local 4-H educator).
6. After you have completed a bundle of mask, contact the 4-H Educator at your local County Extension office. They will work with you to arrange a time to drop off your masks. The masks will be distributed to community members in need including farm workers, grocery store workers, and anyone else who requests a mask!

WHY PARTICIPATE?

  • Your completed projects will fill an immediate need in your local health care system

  • You will grow in your sewing skills

  • You have a chance to encourage community members who may be under stress during this crisis

  • You can document the process and use it for a 2020 County Fair project (health, community service)

WHAT IF I CAN’T SEW?

  • Everyone can write a note of gratitude!

  • Purchase or collect donations of fabric and elastic cord and distribute to those who can sew (be sure to use social distancing practices).

  • Spread the word so more people can join the effort.

    Click here to view a page called “Everything you need to know about making your own face mask”

OTHER THINGS TO NOTE

  • MATERIALS: Fabric made from tightly woven fabrics like quilters cotton or 200 to 300 thread count bed sheet fabric will provide some prevention from a person exhaling virus in droplets expelled during a cough or sneeze.  There is no significant protection for the person wearing the mask from inhaling it from others and the cotton masks are not suitable for medical personnel.

  • PATTERNS: Here are two typical patterns:

    The pleated version with ties OR The more fitted version

  • CARE INSTRUCTIONS: please print and include these use instructions from the CDC (in English/Spanish) for inclusion with your masks! You can also include this tag.

RESOURCES

CDC Guidance on Mask Making
YOUTUBE mask-making tutorial by Melanie K. Ham
CARE AND USE GUIDE from CDC – ENGLISH
CARE AND USE GUIDE from CDC – SPANISH

ripeCommunity: A collaborative platform for listing and finding local food options in Delaware, Broome, Chenango, Otsego, and Schoharie counties during the COVID-19 crisis

At CCE Delaware County, we understand things are rapidly changing and recognize the need for a collaborative solution that will provide consumers accurate information about local food availability while giving local businesses access to markets. Along with other regional entities (including the Delaware County Chamber of Commerce, Center for Agricultural Development and Entrepreneurship, Watershed Ag Council, Pure Catskills, Great Western Catskills, and the Food and Health Network of South Central NY ), we are encouraging local food businesses (farms, farm businesses, restaurants, grocery stores, liquor stores, and others) to use this shared directory to get your information out to the community!

The ripeCommunity Directory allows food businesses to create a listing for themselves and update food availability in real time, giving consumers a cost-free, one source, way to access accurate information about food options, hours of operations, ordering instructions, and food safety precautions. Community members can also use this platform to understand donation support options, regardless of a business’ operational status.

Food businesses and consumers are encouraged to visit the site to list your food or find food. If you have any questions or feedback, please feel free to contact ripecommunity@ripe.io

ripe.io community

""


sheep with two lambs on pasture

Periparturient Egg Rise in Sheep and Goats

Periparturient Egg Rise is a phenomenon all sheep and goat farmers need to be aware of.   The term periparturient means ‘around the time of birthing’.  The phrase ‘periparturient egg rise’ refers to the temporary loss of naturally acquired immunity to internal parasites that results in higher shedding of gastro-intestinal parasite eggs.  This temporary loss of immunity typically starts about 2 weeks prior to and up to 8 weeks after giving birth.

You may wonder how your sheep and goats have intestinal parasites at the end of winter.  Intestinal parasites have evolved many survival strategies.  One is called hypobiosis, which occurs in parasites that are injested the previous fall while your sheep or goats were still feeding on pasture.  The parasite once inside the gut of its host enters a stage of suspended animation where the parasite stops development until the time of lambing when it starts laying eggs in the feces.

When small ruminants are pasture lambed, this increased shedding of parasite eggs is responsible for the start of the rise in parasite populations and is responsible for the early infection of lambs and kids.

Fortunately, there are many ways we can manage this potential problem:

  • Deworm ewes/does that would most benefit from a treatment. These would include thinner animals (BCS of 2), first time pregnant, carrying triplets, or otherwise identified through FAMACHA scoring as being a good candidate.  Use a wormer that is effective against hypobiotic parasite larvae.  Ivomec and Cydectin are most effective while Rumatel is not.  Consider taking a FAMACHA course to get additional training on this technique.
  • Increase protein in late gestation. Feeds rich in by-pass protein are especially advantageous.
  • Lamb indoors and/or prior to spring. The eggs are being passed into bedding and not onto pasture where they hatch and re-infect the sheep.
  • Select for parasite resistance over time. Some sheep and goats are just naturally more resistant to parasite infection.  This is the best long term solution.
  • There is a product called BioWorma which can be fed during the periparturient egg rise period. BioWorma is a feed supplement that contains a naturally occurring fungus that captures and consumes infective worm larvae within the manure once excreted.  However, it is expensive.
  • Practice Evasive Grazing for the first 90 days of your pasture season. Make sure you rotate your animals to fresh clean pasture at least every four days to prevent re-infection.  This is because in warm weather, it only takes 4 days for eggs in the manure to hatch and reach the infective larval stage.  And then don’t come back to the pasture for at least 75 to 90 days.  Most of the parasite larvae shed in the manure on that first grazing will have hatched and died within that time frame.

If you would like help in developing a parasite plan for your farm, contact Rich Toebe, rrt43@cornell.edu

Black Cutworm and Cut Corn Plant – Photo Jamie Cummings, NYS IPM

Be on the Lookout for Black Cutworm Damage in Corn in Delaware County!

This spring throughout the Northeast we are seeing areas with increased catches of Black Cutworm moths in pheromone traps.  Delaware County is one of these areas with elevated Black Cutworm moth catches, and we are starting to hear reports of cutworm damage in the county.  While Integrated Pest Management specialists are quick to point out that elevated catches do not necessarily mean damage will be greater, it does signify that the risk of cutworm damage may be greater.

Black Cutworm moths travel in from other parts of the US on storm fronts, as do many other crop pests.  The moths typically (although not always) look to lay their eggs in areas where there is some green growth, such as weedy fields.  Black Cutworms are nocturnal and feed on corn plants at night.  During the day they hide in the soil at the base of corn plants.   Delayed crop planting this year, puts the seedling corn at greater risk as economic damage thresholds are more quickly achieved on smaller corn plants:

What to D0:

  1. Scout your Corn:Now is the time to get out in corn fields and look for cutworm damage.   Cutworm damage is easy to spot; look for corn plants cut off as the soil level.  Sometimes (especially in dry conditions) the larvae will cut the palnt below the soil surface and the corn seedling will simply wilt and die in place.   Depending on when plants were cut, there may or may not be a corn plant yet on the soil surface.   Where there is evidence of freshly cut plants, dig into the soil within a couple inch radius of the corn plant.  Typically, the cutworm (a black greasy looking caterpillar) can be found readily (see photo).    It should be noted that cutworm damage can look a lot like bird damage where birds snip of the corn plant in the process of trying to pull it up.  The defining variable will be the finding of the cutworm larvae.
  2. Act if Necessary:  Just because you find cutworm damage and live cutworms does NOT mean that you have the pest at a level that will cause economic damage.    Integrated pest management specialists have determined the following economic damage thresholds, when reached or exceeded, would warrant chemical control;
    1. Corn at V2 stage (2 fully emerged leaves with leaf collars)  – 2 cut plants per 100
    2. Corn at V3 stage (3 fully emerged leaves with leaf collars)  – 3 cut plants per 100
    3. Corn at V4 stage (4 fully emerged leaves with leaf collars)  – 5 cut plants per 100
    4. Corn at V5 stage (5 fully emerged leaves with leaf collars)   – 7 cut plants per 100

NOTE:  Be realistic about how extensive the damage is in the field – it may only be in an isolated area

NOTE: If larvae are large (1.25″) they will pupate soon and most of the damage is already done.

If you find you have economic damage and larvae still have growth left (and damage left to do), chemical control is an option, and can be combined with herbicide applications that may still need to be done.

Black Cutworm and Cut Corn Plant – Photo Jamie Cummings, NYS IPM
Header Ag Sponsors

Corn Silage Dry Down Day Results

19 samples of corn were tested on September 18th and averaged 29% Dry Matter (DM). Samples ranged from 24% DM to 34% DM. Whole field DM will be 2 points wetter than a small sample. Download the results (PDF)

A few fields are getting close to or are at target Dry Matter (DM) for harvest, but many are 10 – 21 days out from predicted target harvest moisture, assuming an average dry down rate of 0.5% point per day. This could change with extended dry weather, frosted corn and/or advanced leaf disease damage.

We found that most samples had extensive symptoms of early leaf disease, which may progress rapidly in next few weeks with above average temperatures, dry weather, and maybe even frost in the forecast.

Considerations:

  • Harvesting too early (<32%DM) will result in reduced yield, reduced silage starch content, challenged fermentation and increased risk for silo juicing (which is a potent pollutant as well as tough on silos).
  • It is critical to continue monitoring whole plant DM. Getting DM into the target zone yields best fermentation.
  • Using reputable inoculants, especially when it is getting too dry, can help. Inoculants containing Lactobacillus Buchneri have been shown to be more effective with corn silage.
  • Increasing chop length with wetter silage will reduce silo juicing.
Our next dry down day will be on Tuesday, October 1, 2019 from 10:00am – 2:30pm at
DelRose Farm (The Hanselman’s)
9636 County Route 18 Bloomville NY 13739
Can’t make it? We can test dry matters at any time in our office!  Call the either the Nutrient Management or Precision Feed Management teams at 607-865-7090.